In
this tutorial we are using corel draw graphic studio version x3, be advise,
follow every steps to accomplish this tutorial, I know you can do with me…. Let
get our hand on desk…
§
OPEN COREL DRAW
Select paper type ‘Photo card’ and change from portrait
to landscape format.
Pick a rectangle tool, (F6) for quick
select tool.
§
SHAPE THE OBJECT
(RECTANGLE).
Select shape tool from tool box, (F5)
for Quick Select tool.
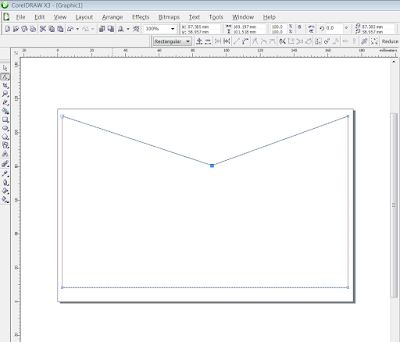
Ø Convert rectangle to
curves, right click on the rectangle ‘convert
to curves’
Ø Create a point at the
first horizontal line, drag down the point down, convert to curves… like below...
Ø Click on the left point
arrange and shape your rectangle like the one below…
Ø Import background to
workspace download the one i used on this tutorial here
Ø Position and powerclip
your background to the rectangle
ü Goto effect tab scroll
down to powerclip rollover to
"place inside container". then click on the rectangle.
Ø After that, Right click on the
rectangle, select ‘edit contents’ to
edit and arrange background to fit the rectangle …
Ø Right click to ‘finish editing this level’ remove BORDER
OUTLINE SET TO NONE.
§ CREATE ECLIPSES AND POSITION THEM.
Ø Select eclipse tool, (F7)
for quick select tool.
Ø Hold down ctrl to create
an eclipse of " Width =54.915 mm and Height=53.814 mm " anyway it turn out just fine, make sure it fit your content.
Ø Increase the outline width, set
outline color, and inside color to the one below…
Ø Duplicate the rectangle
and shape to the one like below...
Ø Add ‘drop-down shadow effect’ and
select ‘preset to flat bottom left’.
Ø Finalize your arrangement
first.
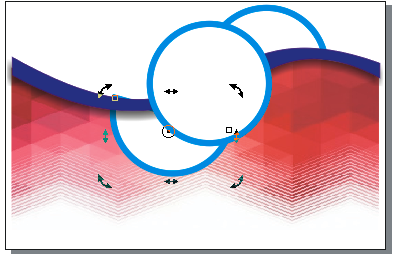
Ø Create three eclipses of
same size like the one above…
Ø Position one at the back
of the rectangle like the one below…
Ø Press ctrl + PgDn to send
the selected objected to back… or simply order...
Ø use the top right arrow to
‘start and ending angles’ till you get half of it.
Ø Arrange your object to
fit, like below
Ø Note: we have used
three eclipse from the ones we duplicated.
Ø Use the remaining one to
roundup your design, add shadow effect to the top shape, the second and the
light green shape (Eclipse) except the last one. like below
Ø Finish up your work with
your own write-up... Enjoy Big-time
Ø Fonts used on this
tutorial are
i.
Chiller
ii.
Lily UPC
iii.
Channel
iv.
Wingding 3 (System Font)
v.
Arial Black (System Font)
Finished work preview here
Enjoy
this tutorial subscribe for more, follow me on twitter or facebook like this, that motivate me to write more…
See
you around sometime....


Hit me with a comment!